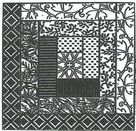
block of the month
2017 - 2019 Block of the Month
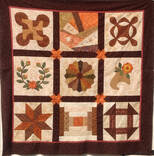
Members participating in the block of the month will keep their own blocks to make into a sampler quilt at the end of the series. These blocks will not be raffled off as has been the practice for BOMs in the past.
Members participating in the block of the month will keep their own blocks to make into a sampler quilt at the end of the series. These blocks will not be raffled off as has been the practice for BOMs in the past.
NOVEMBER 2019
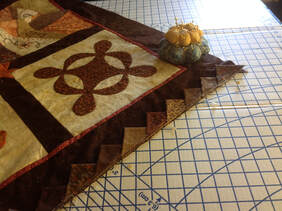
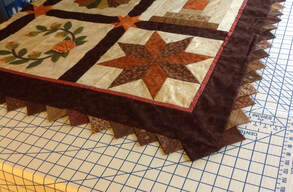
TECHNIQUE: Prairie Points
DUE: January 2020
In the early 1900s, quilters in Colorado used small scraps of fabric folded into triangles to finish the edges of their quilts. This was much more economical than cutting up whole cloth into long bias strips for binding.
These triangles, named Prairie Points, have also been called Sawtooth Edging, Dogtooth Borders and Cats’ Ears. A variety of fabrics will give a scrappy look, and the points can also be of varying heights.
Each prairie point starts with a square. I have started with a four-inch square for my quilt. You can experiment with different sizes, but a Prairie Point taller than 4 ½ inches may flop over because of its weight.
CONSTRUCTION;
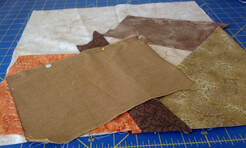
*Cut 4-inch squares of either one color, or many scraps to compliment your quilt. With this size quilt, you will need about 22 squares per side. Cut a few extra to adjust for placement of different fabrics. Should you decide on a different size Prairie Point, you will have to adjust the number of squares needed.
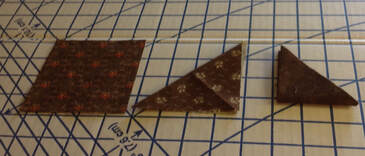
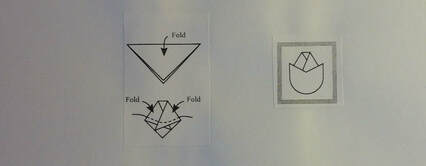
*Fold each square and press. Fold again and press as shown.
*You are now ready to make four “chains” of Prairie Points for your quilt. Prairie Points are often sewn to the edge of the quilt after it has been quilted. However, this means that your border quilting design has to leave at least one inch unquilted, so I prefer to sew them on at this point.
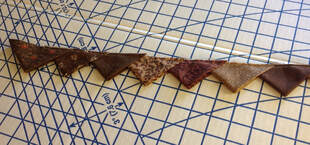
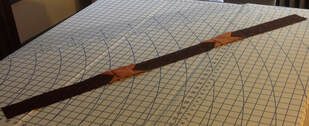
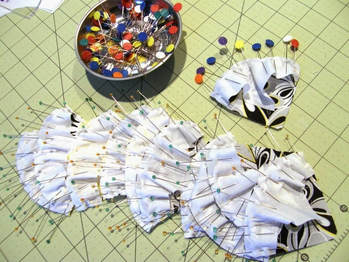
*Make a chain of points, slipping and pinning one point into the fold of the next one, overlapping about an inch. You can adjust this to be a little less, or a bit more, but not more than half way. Pin to the last four or five points.
Sew chain very close to the edge as shown.
*Make a chain of points, slipping and pinning one point into the fold of the next one, overlapping about an inch. You can adjust this to be a little less, or a bit more, but not more than half way. Pin to the last four or five points.
Sew chain very close to the edge as shown.
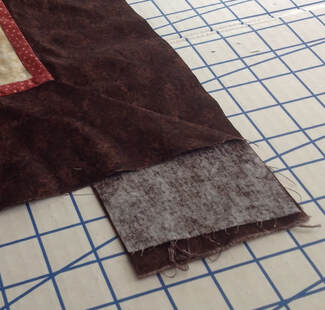
*Pin chain to the quilt with raw edges even and sew with ¼ inch seam allowance. When you get to the end of the sewn chain, pin the remaining points in, adjusting as needed as shown. Sew to the end of border.
*Sew next chain to opposite side of the quilt.
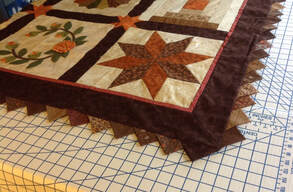
*Sew chains 3 and 4 so that corners come together as shown.
*Finished borders are pressed as shown.
*Sew chains 3 and 4 so that corners come together as shown.
*Finished borders are pressed as shown.
~~~~~~~~~~~~~~~~~~~~~~~~~~~~~~~~~~~~~~~~~~~~~~~~~~~~~~~~~~~~~~~~~~~~~~~~~~~~~~~~~~~~
SEPTEMBER 2019
TECHNIQUES: Sashing, borders and mitered corners
DUE: November Meeting
TECHNIQUES: Sashing, borders and mitered corners
DUE: November Meeting
Now that your blocks are completed, it is time to make your quilt. There are various ways you can set your blocks………..sashing, alternating blocks, on point, or side by side. My instructions will be for a quilt set with sashing with stars, two borders, and mitered corners. The final Block of the Month will be to edge your quilt with Prairie Points.
SASHING
*Sashing will be used only between the blocks.
*Cut the following:
12 sashing strips 12 ½ x 2 1/2
4 squares 2 ½ x 2 ½ for cornerstones
32 squares 1 ½ x 1 ½ for star points
*Construct star points:
8 sashing strips with points on 1 end
4 sashing strips with points on both ends
*How to make the points. See photos below.
Draw a diagonal line on one of the star point squares.
Align it with a corner of the sashing strip, then stitch on the line.
Trim with ¼ inch seam allowance
Then fold the triangle back to corner.
Repeat with other corners.
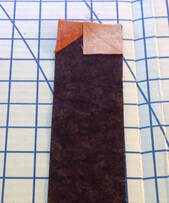
OPTIONS: If you wish to make the sashing a different size, here is how you calculate the size of the star point squares: divide width of sashing in half, then add ½ inch for seam allowance. Cut squares for stars to that dimension.
SEWING THE BLOCKS:
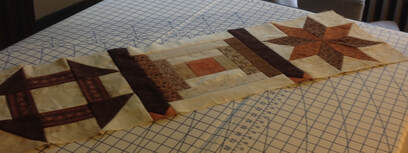
*Line up the blocks into 3 rows in whatever arrangement you desire.
*Sew the three rows of blocks, with correct sashing strips in between. You may have to ease in any block if it is a slightly different size than the sashing stip. If so, the fuller side should be on the bottom when you sew the seam.
* Now sew the sashing strips that go between the rows.
*Sew rows together with sashing in between.
BORDERS
*Again, there are many options for borders. My instructions are for the borders used in my quilt. I added a 1 inch border around the center of the quilt, and then added a 4 inch mitered corner border. The small border frames the design like a mat around a picture, and repeats one of my favorite colors in the quilt.
* The size of outside edges of your quilt may vary from the measurement of the blocks and sashing. Check the size by measuring the quilt through the center of the quilt in two directions. Use this measurement to cut your border.
*To cut borders for mitered corners, use the measurement from the center of your quilt, then add two border widths. Since the quilt is a square, all four borders should be the same length. I always add a couple of inches just to be on the safe side.
*Fold each border to find the center, and mark the center with a pin. Mark the size of the quilt on the border to designate the edge measurements.
*Pin quilt top to border with right sides together. Match the center fold of the border with the center of the quilt top, and the end of the quilt to the designated mark.
*For mitered corners, sew all four borders in this manner:
Start sewing ¼ inch from edge to the end of the seam, stopping ¼ inch from edge.
MITERING THE CORNERS
*Take quilt to the ironing board. With the quilt right side up, starting with one corner, fold one of the borders under at a 45-degree angle. Work with the fold until the corner is square, and the edges of the border line up.
*Press the fold. Pin the ends of the border. You can also place a piece of tape over the fold to keep it in place. Fold the quilt over so wrong side is exposed and pin with pins across the ironed fold. Remove tape. Do this for all four corners.
* Sew the corners beginning at the inside corner, backtracking at the beginning of the seam and sewing on the pressed line.
*Repeat for the three remaining corners. Check to make sure the border is square and lies flat before you cut the ¼ inch seam allowance. Press seam open.
*Press seam allowance toward border.
OPTION: Sew overlapped borders instead. Measure as instructed above. Sew side borders first, then borders to top and bottom.
~~~~~~~~~~~~~~~~~~~~~~~~~~~~~~~~~~~~~~~~~~~~~~~~~~~~~~~~~~~~~~~~~~~~~~~~~~~~~~~~~~~~
May 2019
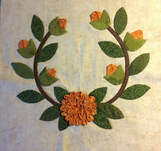
FLORAL WREATH
TECHNIQUES: Bias Stems and 3D Flowers
BLOCK SIZE: 12 inches
DUE: June meeting
This is the last of the blocks. There will be two more sets of instructions to put the nine blocks into a quilt. The pattern for this block will be available at the April meeting.
Step 1: Using a light box, (or a window) transfer the design to the background fabric. Your block should be at least 13 inches, and will be cut to size after the appliqué is completed. When tracing the stem, draw the line in the center of the two lines in the pattern.
Step 2: Make and applique the stems.
Cut 2 bias strips 1 inch wide and about 9 inches long. Fold in half and iron. Sew by machine along the raw edge as close to the edge as you can. Pin strip to the background fabric, positioning the raw edges along the INSIDE curve of the stem, using the drawn line as your guild. Sew, by machine, about 1/8 inch from raw edge. Fold the folded portion back, over the raw edge, and appliqué by hand.
Step 3: Prepare the remainder of the applique pieces. Refer to instructions for appliqué given in the CORNUCOPIA BOM (May 2018, below). Remember to leave unbasted any applique design that will be covered by another item, such as the leaves that will go under the 3D flower.
Step 4: Make gathered flower.
Fabric: Use a fabric that has some print or design, which will make a more interesting flower. Batiks will be harder to do the hand sewing.
Cut a strip 1½ inch wide and 25 inches long, on the straight of the grain. Fold, with wrong sides together and sew about 1/4inch from raw edge. Iron, making sure the seam goes down the middle of one side as shown.
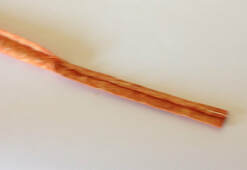
For an alternate method, fold with right sides together and sew ¼ inch seam. Turn to right side, and iron with the seam in the middle of one side.
Using this diagram to show how the marks are spaced, use a ruler to make marks one inch apart on the top side of the strip. Make marks on the bottom side of the strip one inch apart, placing them at the center of the marks above. Mark the entire length of the strip.

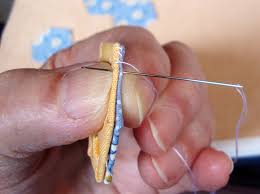
Using thread of a matching color, make a knot and starting at one end, bring your needle up through the bottom folded edge. I like to use quilting thread as it is stronger…don’t want the thread to snap half way through. You will be making a zigzag stitch as shown below. Stitch from dot to dot, taking a stitch OVER the folded edge when you change directions.
Using thread of a matching color, make a knot and starting at one end, bring your needle up through the bottom folded edge. I like to use quilting thread as it is stronger…don’t want the thread to snap half way through. You will be making a zigzag stitch as shown below. Stitch from dot to dot, taking a stitch OVER the folded edge when you change directions.

Stitch about 6 inches before pulling the thread to gather the fabric. Pull the thread, gathering the fabric petals on each side. Continue stitching and pulling until you reach the end of the thread. Tie off.
Arrange the first five petals into a circle, hiding the raw edge underneath. You will be taking small stitches to keep petals in place. You will start making another row of petals, behind the circle you have just made. Turn the flower to the wrong side and keep tacking petals until the flower is formed. Tuck the raw edge behind flower.
Place the flower on the background fabric. I usually start in the center, bring thread up from back, take a tiny stitch in a fold, and sew through to the back. Keep going around each row until flower is completely tacked down. An alternate method would be to be to tack down the tip of each petal. With this method the stitches are more likely to show.
You may add a few French knots or beads to the center if you wish.
Step 5: Folded Bud
Cut a 1 ½ square of fabric. Fold the square diagonally, wrong sides together. Fold each point down to the center point, overlapping the points , basting along the bottom edge of the bud. Place on background. Trim any raw edges of the bud so that it will fit within the markings for the calyx. Pin in place. Appliqué the calyx over the raw edges of the bud, leaving the folds unstitch.
~~~~~~~~~~~~~~~~~~~~~~~~~~~~~~~~~~~~~~~~~~~~~~~~~~~~~~~~~~~~~~~~~~~~~~~~~~~~~~~~~~~~
March 2019
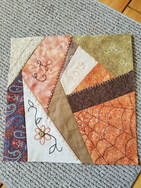
CRAZY QUILT
TECHNIQUE: Foundation piecing and embroidery
SIZE: 12 inch
DUE: May meeting 2019
The Crazy Quilt popularity began at the end of the nineteenth century, and ran for some 20 years. Traditionally, these quilts were made from silks, and velvets, and embellished with laces, beads, and embroidery thread.
FABRIC: You will need a foundation piece of muslin, slightly larger than 12 inches, which will be cut to size when completed.
Basically, you will be using fabric scraps for this block. Decide on a color group and separate your fabrics into light, medium and darks. If you are planning to include an embellishment of particular size, be sure you have pieces large enough to incorporate it. Also, larger scraps mean less pieces and less embroidery.
If you plan to make a Crazy Quuilt block from velvets and silks, please check out instructions for ironing or pressing these fabrics.
THREAD: Your pieces will be sewn on the foundation by machine. Embroidery will be done with either DMC thread or pearl cotton. I found the pearl cotton harder to work with, so settled for either one or two strands of the DMC embroidery . When using the six stranded DMC, pull one strand at a time to avoid tangles and knots.
FOUNDATION PIECING:
STEP 1: Place a three to six sided “odd” shaped piece of fabric in the center of the foundation block, right side up. Place the next piece along one edge, right sides together. Pin in place and sew by machine using a ¼ inch seam allowance. Flip over, press and pin down.
STEP 2; Continue sewing additional pieces clockwise around the center fabric. I found it best to “audition” each piece first before machine sewing, by pinning and flipping first to see if the fabric looks good, and not leaving empty spaces. You may have to clip away some of the excess fabric from previously sewn pieces as shown below.
Continue sewing and flipping, and pressing until the foundation block is covered. Should you wind up with an empty space, or errors, it can be covered by an embellishment or another small piece.
Note: A shortcut would be to sew several small pieces together before adding them to the foundation as one piece of fabric.
EMBROIDERY: Now comes the fun part. Usually each seam is embellished with embroidery stitches. Use multiple colors to coordinate with your fabric. You can add bows, flowers, initials, dates, laces, buttons, trims. An embroidered spider web will insure that you will have good fortune!
Instructions for basic embroidery stitches and letters will be available at the March meeting.
January 2019
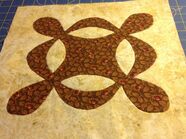
Reel
TECHNIQUE: Reverse Applique
SIZE: 12 inch
DUE: March meeting
The new technique this month is reverse applique. In this block, you will be cutting out the oval shapes to expose the background fabric. In some patterns, another fabric maybe be placed in the “openings” to add a dimensional look.
FABRIC: You will need two fabrics, background and one for the applique design.
NEEDLES: Straw needle.
THREAD: Use thread the color of applique fabric.
TEMPLATE: The template for this block will be given out at the January meeting. It is on cardstock, so may be cut out for easy tracing. Cut out the shape just to the left of the line. Cut the reverse applique shapes on the dotted line.
PREPARING THE APPLIQUE: Refer to the BOM instructions for applique. You may use either method to applique the entire design portion, onto the background fabric. Freezer paper may be used instead of “cardboard”, tracing the applique shape on the dull (not waxy) side. Cut out the design on the line, and iron it on to the wrong side of applique fabric. Cut the applique fabric ¼ inch from freezer paper. Turn the seam allowance over the freezer paper and baste.
APPLIQUE: Center the applique shape on the background square, and applique.
REVERSE APPLIQUE: Before removing the freezer paper, place the template pattern over the applique you have just completed. Draw the oval shapes in place. These are your sewing lines. Now draw ¼ inch from the traced line as shown on your template. These are your cutting lines.
Remove the basting, cut small slits in background fabric to remove the freezer paper. Carefully pinch up just the top layer, and snip into it to begin cutting. Cut away the interior of the oval shape on the cutting line. Make clips into the seam allowance as shown on your template. Do not cut into or beyond sewing line.
Begin turning the seam allowance under with your fingers along the drawn line. Finger press a small section at a time, pin and stitch. Use your needle to needle turn and smooth out the curve. Do a couple of small stitches in the tip of the oval.
PLANNING AHEAD;
If you are planning to use these blocks for a sampler quilt, now is a good time to take out all the blocks to see how they look together. This will help you decide what fabrics are needed for a coordinated look.
Do you have a technique or a particular block you would like to try? Let me know as any suggestions will be welcome.
~~~~~~~~~~~~~~~~~~~~~~~~~~~~~~~~~~~~~~~~~~~~~~~~~~~~~~~~~~~~~~~~~~~~~~~~~~~~~~~~~~~
November 2018
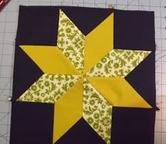
LEMOYNE STAR
TECHNIQUE: Set in seams or Y seams
SIZE: 12 inch block
DUE: January 2019
The Lemoyne Star is one of the most basic patterns in patchwork. What makes it a bit more difficult is the set-in seam, and bias edges on the diamond shapes. However, learning this technique will help in the construction of many other block designs.
The instructions for sewing the diamonds into the star design, and the templates will be distributed at the November meeting. Following are the instruction for setting in the squares and triangles to complete the block.
*Cut out the templates, just to the left of the drawn line. Using an awl, or a small hole punch, make holes in the corners of each template as marked. These dots should be ¼ inch from edges, or where the seam lines intersect. Seam allowances are included in the templates.
*When cutting your fabric pieces, be sure to place the base of your triangle on the straight of grain as marked. This will insure that all outside edges of your block are on the straight of grain, and not on the bias.
*To cut your diamond shapes, place one edge on the straight of grain. When sewing the star, try to line up the diamonds so that one will be on the bias and the other will be on the grain. This will prevent the finished star from being “cup” shaped.
*Most seams are sewn simply from edge to edge, with the exception of set-in seams. These seams must start and stop exactly ¼ inch from the edges of the fabric. The easiest way to know where to start and stop is with a matching dot. Each piece will require matching dots. The dots are drawn on the wrong side of the fabric, using the template of the pattern piece.
*Starting with the square, place the square on the bottom, and line up with one of the diamonds. Pin through the dots. Start sewing from dot at the Y seam, taking a back stitch. Sew toward the outside edge, going through the dots to the edge. Line up the other side of the square and repeat.
*Repeat with other squares and triangles to complete the block.
NOTE: There are many tutorials showing how to sew the Y seam that you may find helpful. Tutorials by Jinney Beyer or Fons and Porter are especially good.
WARNING: Do not sew the Lemoyne Star by using the quickie half square triangle method!
~~~~~~~~~~~~~~~~~~~~~~~~~~~~~~~~~~~~~~~~~~~~~~~~~~~~~~~~~~~~~~~~~~~~~~~~~~~~~~~~~~~
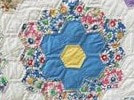
September 2018
Grandmother’s Flower Garden
TECHNIQUE: English Paper Piecing
BLOCK SIZE: 12 inch
DUE: November meeting
Grandmother’s Flower Garden is the block most associated with English Paper Piecing. Good use for many scraps. Center hexagon often done in yellow, with multiple colors to complete the pattern.
TEMPLATE:
Paper templates are cut to the exact size of the finished quilt pieces. Master template will be given to you at the meeting. Trace around it onto typing paper. You will need 19 to complete the pattern. Cut the shapes out just inside the tracing line.
CUTTING:
Pin the template to the wrong side of your fabric. You can mark a ¼ inch cutting line from the template, or just as easily, eye ball it. Cut each piece out. Also fun to center your template over a specific design, centering it within the template.
STEP 1. With template pinned to your fabric, fold the seam allowance over the paper on one side. Using a contrasting thread, start to baste by coming up from the front so the knot is on the right side. Baste the fabric to the template with two or three stitches on each side of the hexagon.
STEP 2: When you have two pieces basted, place the pieces right sides together and sew with a whipstitch through the folded edge of the fabric along one side. Use an applique needle and matching single strand of quilting thread. Try not to sew through the paper when joining the pieces. There is no need to pin the hexagons together.
Continue adding hexagons to the center, until the first row is complete. Add second row of hexagons in a different color.
SEWING TO BACKGROUND SQUARE:
Take out the basting on the first row of hexagons. Remove the paper templates.
Center the flower on the background square and pin in place.
Applique all edges of the flower to background square. Remove the basting, cut a small slit in background fabric and remove the paper.
~~~~~~~~~~~~~~~~~~~~~~~~~~~~~~~~~~~~~~~~~~~~~~~~~~~~~~~~~~~~~~~~~~~~~~~~~~~~~~~~~~
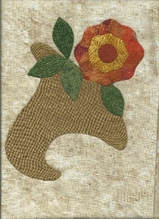
May 2018
BLOCK DESIGN: Cornucopia
TECHNIQUE: Hand applique
BLOCK SIZE: 12 inches
DUE: September meeting
There are many ways to do hand applique. It is a very useful and versatile technique to learn. Instructions will be given for two ways to do applique.
BACKGROUND FABRIC: Always cut about two inches larger than the block size as this technique sometimes distorts the block. Cut to size when completed.
FABRIC FOR APPLIQUE: This technique lends itself to using up your scraps., Batiks tend to be a bit more difficult to work with than other fabrics.
THREAD: Thread color must match the color of the applique fabric, not the background. To avoid having to buy a lot of thread to match, you may use silk thread. I use #223 for all but the lightest fabrics. However, silk thread tends to slide out of the needle easily, so tie a knot at the eye of the needle several times.
NEEDLES: Straw needles #9 or 10 are good.
TEMPLATES: Templates for applique are cut the actual size of the applique shape.
The seam allowance will be added when the motif is cut from the fabric.
PREPARING THE BACKGROUND FABRIC FOR APPLIQUE: Fold the background fabric in quarters to find the center. The master copy will be printed and given to you at our meeting. Lay the background fabric over the pattern. Line up with the folds and pin. Trace the pattern on to the background fabric to serve as placement lines. Mark slightly inside the actual shape so that you will not have pencil marks showing on the finished blocks.
************************************************************************
ALL OF THE ABOVE IS DONE FOR WHICHEVER METHOD YOU DECIDE TO USE. THE DIFFERENCE IS IN THE WAY YOU PREPARE YOUR MOTIFS AND SEW.
METHOD #1: APPLIQUE WITH “CARDBOARD” TEMPLATES
Use the cardboard throw away ads included in magazines to make applique shapes. Trace around templates, making as many copies of each shape needed for the design. Cut out on drawn line. Pin shape to wrong side of fabric oriented on the bias. When pinning an asymmetrical shape, such as the cornucopia, reverse before pinning or it will be backwards. Eyeball cutting around the shape leaving about ¼ inch seam allowance.
Baste fabric to cardboard, using needle to pull tightly. Be sure knot is on right side of fabric. When basting is complete, you will notice pleats in the curved area. Snip so seam allowance will lay flat. Do not turn the seam allowance under when shape tucks under another one, such as the top of the cornucopia. To make a sharp point for the leaves, turn the seam allowance on one side, then fold in other side. Clip the seam allowance at the indentations, such as in the flower.
Starting with the cornucopia, place over the marked lines on background fabric. With knotted thread, come up from the background and just catch the fold of the cardboard shape. Go back down next to where the needle just came up and travel about 1/8 inch. Come up again and repeat for each stitch. Pull your stitches fairly tight so they are not loose. End with 3 or 4 little stitches on the back inside the applique shape.
When sewing is finished, remove basting and remove cardboard. You can either make a small slit behind the shape and with tweezers, remove cardboard. If you do not want to cut into the background, applique ¾ of the way around the shape, remove the basting and pull out the cardboard. Then complete the applique.
METHOD #2: NEEDLE TURN APPLIQUE
Needle-turn applique derives its name from the action of turning under the seam allowance edge of applique pieces with the needle used for stitching.
Place the template on the fabric’s right side. Draw around the template with a non-permanent marking tool of your choice, making a line no darker than necessary to be visible. Cut out the shape, eyeballing a ¼ inch seam allowance on all sides.
To blind stitch the applique shapes, position it on the background fabric, pinning in place, or use a dab of glue stick. Begin stitching on a straight or gently curved edge, not at a sharp point or corner. Pull needle and knotted thread up through the background fabric and folded edge, barely catching edge of fold.
Reinsert needle into background fabric beside folded edge where thread was first brought through and make a 1/8 “stitch, bringing point of needle back up through background fabric and through folded edge of applique piece. As you begin each stitch, make sure needle enters background fabric right next to thread coming up through folded edge of applique.
Use point of needle to turn under a small portion of the applique piece seam allowance, using needle to smooth curves in folded edge. Use thumb to hold the fold down. Pull each stitch to keep it tight but not pucker background fabric. Stitches on top should be nearly invisible. Stitches on back side of background fabric should be straight and approximately 1/8 long. Finish with two or three stitches behind applique shape and cut thread.
HELPFUL HINTS:
*Clip into curved shapes, but not into marked lines or folds.
*Avoid loose stitches. They pull out easily.
*Right hand sewers sew counter-clockwise, left hand sewers sew clockwise.
*When complete, iron on wrong side.
~~~~~~~~~~~~~~~~~~~~~~~~~~~~~~~~~~~~~~~~~~~~~~~~~~~~~~~~~~~~~~~~~~~~~~~~~~~~~~~~~~~
MARCH 2018

DRUNKARD’S PATH
BLOCK SIZE: 12 INCH
TECHNIQUE: CURVED PIECING
DUE: MAY MEETING
BACKGROUND: Drunkards Path is one of the most familiar curved pieced designs. It was very popular in the late 1900s, and usually done in blue and white, which were the colors of the WCTU, the Women’s Christian Temperance Union
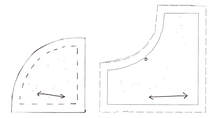
TEMPLATES: Two templates are needed for this block. Seam allowance is included. The shapes below are not the templates. Templates for this block will be printed at Quik Print and distributed at the meeting.
The shapes below are meant only for identification for cutting and sewing. The left is the convex template, and the right is the concave template.
FABRIC AND CUTTING; Usually done in two fabrics, a dark and a light. The design is created by using the concave template for 8 pieces with the dark fabric and 8 pieces with the light fabric. The same is done with the convex template
PINNING:
*To pin, fold the curved pieces to find the center and crease. Placing the convex piece over the concave piece, pin at the center.
*Line up the straight edges and pin……then ease the curved edges, aligning them and pinning in place.
PINNING:
*To pin, fold the curved pieces to find the center and crease. Placing the convex piece over the concave piece, pin at the center.
*Line up the straight edges and pin……then ease the curved edges, aligning them and pinning in place.
SEWING: This block can be sewn by machine. However, if the curved part seems too intimidating for machine piecing, now that you know how to hand piece, you may do that part by hand and then machine sew the squares. If machine sewing, remove the pins just before the presser foot touches it. Do not clip the seam allowance.
*To complete the block, once all the squares have been pieced, lay out all the squares in the configuration you want. Sew each row of four squares, and then sew the rows.
*There are additional options for completion of this block. Those patterns are on the printed sheet with the templates.
PRESSING: Press gently on the right side, usually toward the dark fabric. Try to prevent pleats. Since the curve is on the bias, try not to stretch as you press.
~~~~~~~~~~~~~~~~~~~~~~~~~~~~~~~~~~~~~~~~~~~~~~~~~~~~~~~~~~~~~~~~~~~~~~~~~~~~~~~~~~~
NOVEMBER 2017
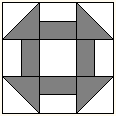
CHURN DASH
BLOCK SIZE: 12 INCH
TECHNIQUE: HAND PIECING
PATTERN: Available upon request from Connie
INSTRUCTIONS FOR HAND PIECING
FABRIC: You will need one dark fabric, and one light one. Or you may use one dark fabric for the triangles and a different dark or medium for the rectangles.
TEMPLATES: Use plastic template material for templates, or cardboard. Perfect would be a cereal box. If using template material, place over pattern and draw. Otherwise, paste to cardboard, trace, and cut. These templates will be used to mark your sewing line.
MARKING AND CUTTING PATCHES: For this block, I smoothed my two fabrics with right sides together, with the light fabric on top. Use a pencil with sharp point, or mechanical pencil and mark around each template. Leave about ¾ inch between marked patches. Now that your sewing lines are marked, either use your rotary cutter to cut ¼ inch outside the marked lines, or use your ruler to mark a ¼ inch cutting line, and then cut with scissors. You will only need one square of the light fabric for the center of your block, so it doesn’t have to be layered.
GETTING READY TO SEW: I use quilting thread in a color that matches the fabrics. Use a needle of your choice...sharps are good. Have straight pins and scissors handy.
SEWING PATCHES: Sewing will be done in the same order as you would if doing machine piecing. With light, marked side up, put a pin in the beginning of the marked line, and at the end. Thread needle with about 20 inches of thread, and knot the end. Remove first pin, and insert the needle exactly at the beginning of the marked line and make a stitch. Make running stitches, taking two or three at a time. Take a back stitch every two or three stitches. End the line of stitching at the end of the marked line (not to the end of the patch) Take a couple of tiny back stitches and cut thread.
PRESSING: This is your choice. You may press after piecing each unit, or finger press, or wait and press when the block is completed. Press toward the dark fabric.
COMPLETING THE BLOCK: This is done the same as in machine piecing……….sew the squares, sew the squares into rows, and then sew the rows together. However, when you do this, you will not find a sewing line marked on the dark fabric. This can now be done by placing your template wherever lines must be marked, and trace around the template. When sewing the squares together, when you come to a seam, sew up to the seam allowance, take a tiny back stitch, sew through the seam allowances, take another back stitch, and continue to end of line. edit.
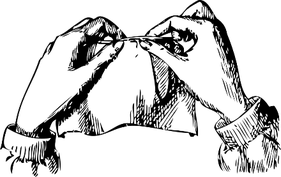
TAKING THE TROUBLE OUT OF HAND PIECING
1. Cut templates accurately
2. Mark your sewing lines close to the template so that you will duplicate the pattern piece exactly.
3. Sew only on the marked seam lines, not through the seam allowance.
4. Enjoy trying something new. Remember, if you don’t like hand piecing, you will never have to do it again.
~~~~~~~~~~~~~~~~~~~~~~~~~~~~~~~~~~~~~~~~~~~~~~~~~~~~~~~~~~~~~~~~~~~~~~~~~~~~~~~~~~~
JANUARY 2018
LOG CABIN
BLOCK SIZE: 12 INCHES
TECHNIQUE: STRING QUILTS
DUE: MARCH MEETING
FABRIC
Using colors of your choice, select 3 dark fabrics and 3 light fabrics. For a scrappier look, choose 6 of each color. Traditionally, for the center square, a red fabric was used to signify the hearth, or a yellow fabric for the light in the window.
CUTTING
For this block, you will not need templates. Strips will be cut 2 inches wide, finished size 1 ½ inches. The lengths may vary as they will be trimmed to the correct size as the block is constructed.
Cut a 3 ½ square from your center square.
Be sure to cut strips on the straight of the grain.
PIECING
*Pin a strip of light fabric, right sides together, to the center square. Machine sew, using a ¼ inch seam allowance. Trim the strip so that it is exactly the size of the center square.
*Select a second strip of the light fabric and sew to the adjacent side, and then cut to size.
*Now sew the two dark fabrics to the remaining sides of the center square, trimming to size.
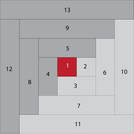
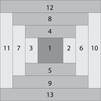
*Continue sewing logs, following the numbered sequence as shown on the figures above, until the block is completed.
PRESSING
*Pressing is essential when piecing this block.
*As you sew on each log, first cut to size. Press seam closed to set the stitches, then press seam allowance to the dark fabric.
COURTHOUSE STEPS
Using the same measurements for cutting as for the Log Cabin block, try the block below.
Using the same measurements for cutting as for the Log Cabin block, try the block below.
*Since there are so many seams in this block, it is important that your seam allowance is exactly
¼ inch. To check, cut two strips of fabric about 5 inches long and 1 ½ inch wide. Sew and press. If your piece does not measure exactly 2 ½ inches wide, make adjustments.
¼ inch. To check, cut two strips of fabric about 5 inches long and 1 ½ inch wide. Sew and press. If your piece does not measure exactly 2 ½ inches wide, make adjustments.
~~~~~~~~~~~~~~~~~~~~~~~~~~~~~~~~~~~~~~~~~~~~~~~~~~~~~~~~~~~~~~~~~~~~~~~~~~~~~~~~~~~~~~~~~~~~~~~~~~~~~~~~~~~~~~~~~~~~~~~~~~~~~~~~~~~~~~~~~~~~~~~~~~~~~~~~~~~~~~~~~~~~~~~~
Prior Years Block of the Month project.
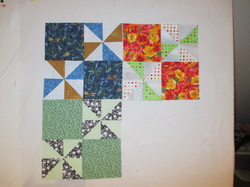
Spring Pinwheel / “along came pretty little May”
This is a 10 ½ inch block consisting of a floral (think spring!), a sky blue background for the pinwheel and a pinwheel of one or more colors – solid or print to stand out against the sky blue and to coordinate with your floral.
A = floral
B = sky blue
C = pinwheel
Cut two 5 ½ inch square pieces of A
Cut four 3 3/8 inch squares of sky blue
cut four 3 3/8 inch squares for pinwheel
Place a sky blue square and a pinwheel square right sides together and draw diagonal line on one fabric. Stitch ¼ inch on either side of this drawn line, cut on center diagonal. Press open for two half square triangles. (I pressed open all the seams in this block to minimize bulk) Do this for all blue and pinwheels for a total of 8 half square triangle squares (OR – use method of your choice to make 8 half square triangle squares of blue and pinwheel fabric). These square should measure 2 ¾ inches. When 4 are put together this measures 5 ½ inches square (same as floral square)
Assemble square as shown in diagram.
Questions ? call Corinne Levy
November 2014 Block of the Month.
Your browser does not support viewing this document. Click here to download the document.
